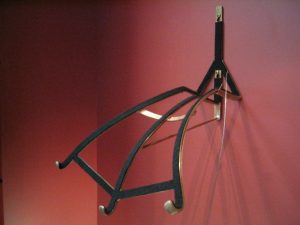
 Using strips of mat board as a templating material, I laid out the fair curves of the proposed mount along the strongest parts of the object. Finding the best locations for support defines the 3D relationships of the various pieces. As the design took shape, I taped the pieces together to give a feel of the final mount. At some point, I felt I had enough information to start bending annealed brass stock and fitting it directly to the curves of the object. This is where the value of the mat board templating became apparent. Through using it, I was able to determine a path for each piece of metal that was a simple curve. There is no twisting in any of the main structural elements. If twists are introduced into the geometry of the mount, the complexity of the spatial relationships vastly increases, and the ability to maintain alignment with the object becomes much more difficult.
 Once the curves were established, the connecting pieces were fitted and joining begun. At each step of the way, the padded framework was returned to the object to confirm fit, and to mark the lengths and angles of the next additions. Soon the hanging structure was fabricated and small triangulating strut added to counteract any sagging by the support web.
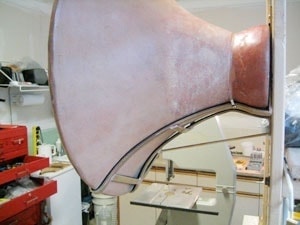
When completed, the bowl slipped into the padded mount with a feeling of great security and support. To ensure that position, a fine cable was looped over the bowl at the junction of the flare and the base, and secured with a #4-40 screw in a tapped hole. With this final security measure, the mounted bowl was both beautiful, and prepared to withstand a seismic event. On February 28th 2001, that test was given by the 6.8 magnitude Nisqually earthquake. This bowl, and all other pieces that had been mounted, came through with no damage. Whew…
Leave a Reply
You must belogged in to post a comment.